Design5 min read
 Clothify
 tools
Check image resolution at your intended print size. Preview artwork and calculate the pixels you need.
See your print at full size
Choose an image or type its pixel size, or try the example.
Choose the original PNG, JPEG or WebP file, or type its width and height in pixels.
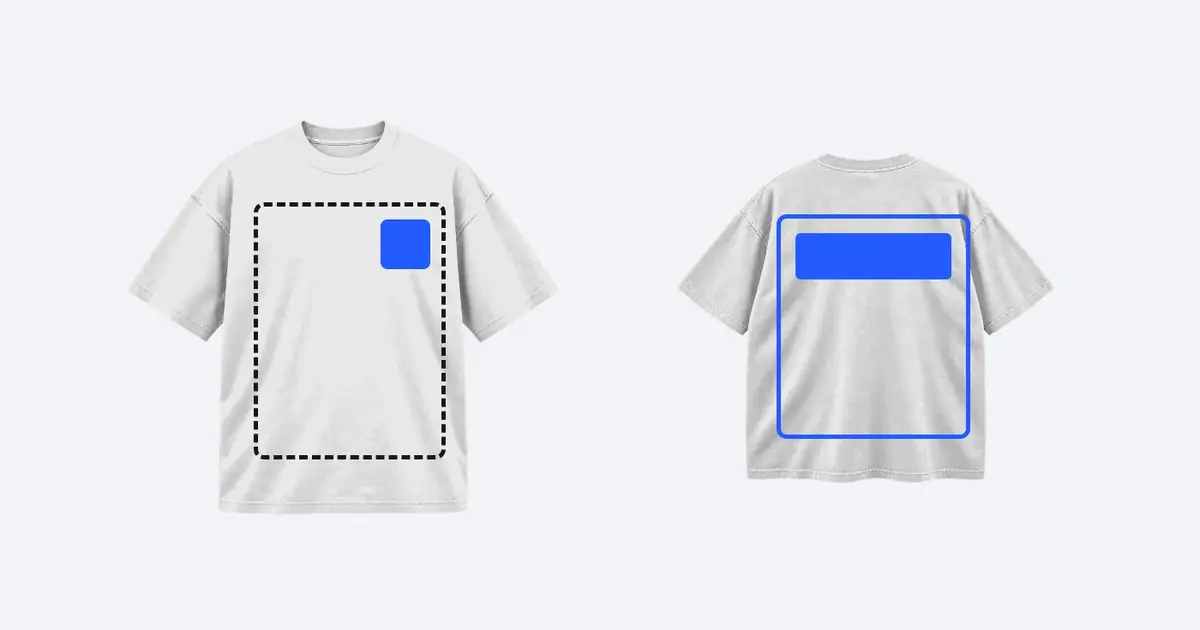
Type the width it will print at, or tap a T-shirt placement such as left chest or full front.
Use the resolution in your supplier’s file guide for that product. The tool starts at 300 DPI.
Read the effective DPI, see the art on a shirt at scale and find the widest size that still meets your target.
This is the scenario the Try an example button loads: an image 3,000 pixels wide and 3,600 tall, printed 12 inches wide against a 300 DPI target.
Twelve inches is the width of the full front print area on the T-shirt in Clothify’s placement guide. Spread across that width, 3,000 pixels give 250 pixels to every inch, so the effective resolution is 250 DPI. The height follows the image’s proportions: 3,600 pixels at the same density print 14.4 inches tall, which still fits inside the 16 inch print area.
That is below the 300 DPI target. There are two honest fixes. Print smaller: 3,000 pixels reach 300 DPI at 10 inches wide. Or export a larger original: a 12 inch print at 300 DPI needs 3,600 × 4,320 pixels. If the supplier’s guide for the product asks for 150 DPI instead, the original file already clears it.
The arithmetic
Print resolution is how many image pixels land on each inch of fabric. It depends only on the pixel width and the printed width.
Effective resolution
Image width in pixelsdivided byPrint width in inchesequalsEffective DPI
Print areas and widths come from Clothify’s T-shirt design placement guide, which records Printful print files for a Bella+Canvas 3001 tee and a Gildan 18500 hoodie, size M, on November 8, 2026, plus Clothify’s own editor limits.
Printful’s print file preparation guidance describes 150 DPI for many apparel products and higher targets for some smaller or detailed work. Check the guide for your exact product.
Your image is read by this browser page only. It is never uploaded, and the preview is released when you remove the image, reset or leave.
The pixel size a file needs to print each common T-shirt and hoodie placement at 150 and 300 DPI. Width only where the placement has a width limit but no fixed height.
| Placement | Recorded on | Size (in) | At 150 DPI | At 300 DPI |
|---|---|---|---|---|
| Left chest logo | T-shirt, Clothify limit | 3.5 wide | 525 wide | 1,050 wide |
| Sleeve | T-shirt, Printful | 4 × 3.5 | 600 × 525 | 1,200 × 1,050 |
| Center chest | T-shirt, Clothify limit | 4.5 wide | 675 wide | 1,350 wide |
| Upper back | T-shirt, Clothify limit | 11 wide | 1,650 wide | 3,300 wide |
| Full front or back | T-shirt, Printful | 12 × 16 | 1,800 × 2,400 | 3,600 × 4,800 |
| Hoodie front | Gildan 18500, Printful | 14 × 14 | 2,100 × 2,100 | 4,200 × 4,200 |
Use the number in your supplier’s file guide for that exact product. Printful’s print file guidance describes 150 DPI for many apparel products and higher targets for some smaller or detailed work. This tool starts at 300 DPI as a stricter target, and you can change it.
At 150 DPI a 12 by 16 inch print needs 1,800 × 2,400 pixels. At 300 DPI it needs 3,600 × 4,800 pixels. Multiply each side in inches by the DPI you need.
For printing, DPI is the image width in pixels divided by the printed width in inches, so the same file has a different DPI at every size. The DPI number stored in the file is only a label. Choose your file above or type its pixel width to see the real value at your print size.
Changing the DPI setting in an editor only rewrites that label. Resizing an image to more pixels makes a larger file, but the software invents the new pixels, so fine detail still looks soft. The reliable fixes are to print smaller or export a larger original from your design file.
PPI means pixels per inch in an image at a given size, and DPI strictly means ink dots per inch from a printer. Print suppliers usually say DPI when they mean pixels per inch at the printed size, and this calculator uses DPI in that sense.
No. The file is read by your browser to measure its pixels and draw the preview, and it never leaves this page. The preview is released when you remove the image, press Reset or leave the page.
Design5 min read
Design5 min read
Design5 min read